Jalapeno 2nd place

Jalapeno 2nd place
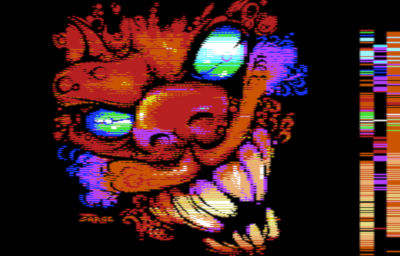
The Sarge/Fairlight released the VIC20 image "Jalapeno" at Fjälldata 2023 and it came in 2nd place! The image requires 16 kB expansion.
Re: Jalapeno 2nd place
There’s no music on NTSC machines due to lack of CPU cycles.
-
orion70

- VICtalian
- Posts: 4341
- Joined: Thu Feb 02, 2006 4:45 am
- Location: Piacenza, Italy
- Occupation: Biologist
Re: Jalapeno 2nd place
It's simply wonderful 

-
joshuadenmark

- Big Mover
- Posts: 1218
- Joined: Sat Oct 23, 2010 11:32 am
- Location: Fr-Havn, Denmark
- Occupation: Service engineer
Re: Jalapeno 2nd place
Spooky 

Kind regards, Peter.
____________________________________________________
In need of a wiki logon - PM me
____________________________________________________
In need of a wiki logon - PM me
Re: Jalapeno 2nd place
If you're lazy like me, the youtube version [youtube]https://www.youtube.com/watch?v=hHL4wHSQ0sU[/youtube]
With that said, it will just be a matter of time until I will want to watch it on the real thing
With that said, it will just be a matter of time until I will want to watch it on the real thing
-
Mike

- Herr VC
- Posts: 4841
- Joined: Wed Dec 01, 2004 1:57 pm
- Location: Munich, Germany
- Occupation: electrical engineer
Re: Jalapeno 2nd place
You also had your fair share in the credits.bjonte wrote:The Sarge/Fairlight released the VIC20 image "Jalapeno" at Fjälldata 2023 and it came in 2nd place! The image requires 16 kB expansion.
It would be interesting to see some workstages of the picture, as well as some info about the used tools: it appears to me the face was first drawn in black/white and then was colourized. The 'technology' behind the display mode seems to be fairly similar to tlr's fcb, with inline splits of background/border/auxiliary colour, the higher resolution of 152x256 (instead of 168x192 for fcb) traded against the finer colour RAM resolution (still 8x16 cells instead of 8x4 cells with fcb). Surely a lot of work to place all those register splits if done by hand.
For the record, here's how Jalapeño renders in VFLI (download):
Re: Jalapeno 2nd place
Really outstanding picture, but i'd expect no less from The Sarge =)
Just mail him about workstages, he'll probably be happy to share them
Just mail him about workstages, he'll probably be happy to share them
I'm just a Software Guy who has no Idea how the Hardware works. Don't listen to me.
Re: Jalapeno 2nd place
It's constructed from two images, a background color image and a foreground color image. Using those two, flexible assembler code is generated to set cycle exact background, border, auxillary and character colors in order to achieve the same result on the VIC20. So any of the available colors can be changed at any cycle, as long as there's CPU time left to do so. The Sarge has spent a lot of time painstakingly pixeling this until all pixels could be rendered, starting from a sketch with a lot of errors. I'm truly amazed by his patience and dedication.
-
Mike
- Herr VC
- Posts: 4841
- Joined: Wed Dec 01, 2004 1:57 pm
- Location: Munich, Germany
- Occupation: electrical engineer
Re: Jalapeno 2nd place
Oh! That means even though the underlying mode uses 8x16 attribute cells, one can have dynamic updates of the colour RAM, even if those updates are a comparatively scarce resource. Nice!bjonte wrote:[...] flexible assembler code is generated to set cycle exact background, border, auxillary and character colors [...]
Re: Jalapeno 2nd place
Yes, exactly! Quite expensive to do each write but it’s possible to have 8*1 color cells in local areas of the image.
Re: Jalapeno 2nd place
Hi.
Some words from me explaining how I made this image.
Jonas asked me some months ago if I wanted to do an image on the VIC20 and really try to push the computer to do stuff that is on the limit.
I said yes. At that time we didn't have any tools or working process of how this was going to be made. We only knew Jonas would have to do an "error checker" tool that showed me if the image I was going to pixel is correct and runnable on the VIC20.
We had a talk and soon came to the conclusion that pixel in Photoshop and having the error checker look at the image for errors was the best way. We could have gone the route of making a complete pixel editor for this but decided rather quickly that it was way too much work.
So the solution was to have Photoshop export the background and foreground layers as two separate files and loading them in the error checker tool.
When Jonas had the first version of the tool ready I started to try it out. I started with deciding how big the image was going to be. Naturally I wanted it to be BIG! And then setting the correct aspect ratio in Photoshop. Making two layers for the bg/fg. And an action script that saves out the two layers to a certain file.
At the same time I started to send a lot of requests to Jonas to make the tool more streamlined and Jonas was quick to implement those.
So we after a month or so ended up with a good workflow and lots of error checking options in the tool to help me work smoothly.
For an example the error checker reloads the bg/fg images automatically when it sees there is a new version saved out from Photoshop. So I have assigned F2 to the action script for saving out those layers so it's just a button press to see it updated in the error checker. This way is was way quicker and easier to fix errors.
I have to say that this is my first VIC20 image ever. It's only been C64 and Amiga/PC before. Well, some never released images on the Texas TI-99/4A was made in 1982 or so I think.
So Im not 100% with all the terms and exactly how the VIC20 works. I just pixel, try some things and export them to the error checker and after that its error fix time. I learn along the way. So now I know what to avoid and what I can use for the next picture.
This image started like all my other images, sketch in ProCreate. Then export the outlines and using those as the foreground layer.
After that I started to fill in colors using the background layer and combined it with the foreground layer where I needed to dither or have smaller details than I could do with the background layer that basically needs four chars before I can change the color.
So it was A LOT of trial and error, remaking stuff, moving things, breaking things before I had something that was error free. Changing one thing in the eye could break stuff on his nose for an example. So this was going on for several weeks actually. But it was fun! Some areas in this image was harder than others. I wanted to avoid using multicolor mode but in some places it was impossible not using it. But I tried to hide those pixels a bit.
Sadly I don't have any work stages since I always saved of the same file so the error checker would auto load it. And somehow I forgot to save out work stages from Photoshop too... Next time I'll try to remember to save those out.
Its all been 100% manual work and no conversion was done.
/Sarge
Some words from me explaining how I made this image.
Jonas asked me some months ago if I wanted to do an image on the VIC20 and really try to push the computer to do stuff that is on the limit.
I said yes. At that time we didn't have any tools or working process of how this was going to be made. We only knew Jonas would have to do an "error checker" tool that showed me if the image I was going to pixel is correct and runnable on the VIC20.
We had a talk and soon came to the conclusion that pixel in Photoshop and having the error checker look at the image for errors was the best way. We could have gone the route of making a complete pixel editor for this but decided rather quickly that it was way too much work.
So the solution was to have Photoshop export the background and foreground layers as two separate files and loading them in the error checker tool.
When Jonas had the first version of the tool ready I started to try it out. I started with deciding how big the image was going to be. Naturally I wanted it to be BIG!
At the same time I started to send a lot of requests to Jonas to make the tool more streamlined and Jonas was quick to implement those.
So we after a month or so ended up with a good workflow and lots of error checking options in the tool to help me work smoothly.
For an example the error checker reloads the bg/fg images automatically when it sees there is a new version saved out from Photoshop. So I have assigned F2 to the action script for saving out those layers so it's just a button press to see it updated in the error checker. This way is was way quicker and easier to fix errors.
I have to say that this is my first VIC20 image ever. It's only been C64 and Amiga/PC before. Well, some never released images on the Texas TI-99/4A was made in 1982 or so I think.
So Im not 100% with all the terms and exactly how the VIC20 works. I just pixel, try some things and export them to the error checker and after that its error fix time. I learn along the way. So now I know what to avoid and what I can use for the next picture.
This image started like all my other images, sketch in ProCreate. Then export the outlines and using those as the foreground layer.
After that I started to fill in colors using the background layer and combined it with the foreground layer where I needed to dither or have smaller details than I could do with the background layer that basically needs four chars before I can change the color.
So it was A LOT of trial and error, remaking stuff, moving things, breaking things before I had something that was error free. Changing one thing in the eye could break stuff on his nose for an example. So this was going on for several weeks actually. But it was fun! Some areas in this image was harder than others. I wanted to avoid using multicolor mode but in some places it was impossible not using it. But I tried to hide those pixels a bit.
Sadly I don't have any work stages since I always saved of the same file so the error checker would auto load it. And somehow I forgot to save out work stages from Photoshop too... Next time I'll try to remember to save those out.
Its all been 100% manual work and no conversion was done.
/Sarge
-
Mike
- Herr VC
- Posts: 4841
- Joined: Wed Dec 01, 2004 1:57 pm
- Location: Munich, Germany
- Occupation: electrical engineer
Re: Jalapeno 2nd place
First of all, welcome to Denial!
Lots of years ago, Mermaid did a nice self-portrait in Picasso:

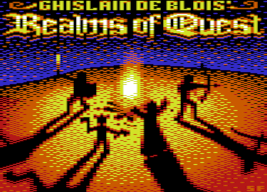
Then, in 2009 saehn pixeled the intro screen of Realms of Quest 3 in MINIPAINT:
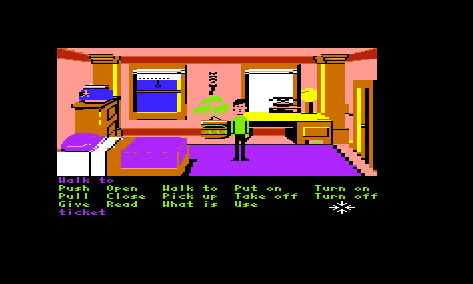
Three years later then, Doozy Twilight, pixeled by Exin, in fcbpaint:

The paint programs mentioned above all run on native hardware, and are roughly ordered in their capabilities. Picasso is multicolour only, and unfortunately uses a bitmap size (176x176) that requires to clobber OS workspace, so getting other things running beside display is rather difficult. MINIPAINT employs a slightly smaller resolution (160x192), but it allows to mix hires and multicolour and the screen mode is much more OS friendly. Lastly fcbpaint offers much more colour resolution (in-line VIC register splits and 8x4 attribute cells) at a 168x192 resolution, but again uses OS workspace.
A common trait of these three editors is, they operate with effectively isotropic attribute data, so here you don't have to fear that changes in one part of the picture 'break' other parts of the picture that previously worked. All changes are local by nature. With MINIPAINT, changing a cell between hires and multicolour only happens where absolutely necessary so the current pixel is always put as intended. fcbpaint uses a similar logic, however the in-line VIC register splits require a manual check (compile within fcbpaint and eyeball whether it works out).
MINIPAINT comes with a tool suite, one of the tools allows to import line art, which then can be edited in MINIPAINT. Furthermore, a tool exists to export the picture so further refining in fcbpaint is possible. That's how Exin actually created the Doozy picture.
...
Do you have any plans to show up on Revision this year?
Greetings,
Michael
At last, humble VIC-I once again gets some attention from a graphician to show what it really is capable of.The_Sarge wrote:Hi.
Lots of years ago, Mermaid did a nice self-portrait in Picasso:
Then, in 2009 saehn pixeled the intro screen of Realms of Quest 3 in MINIPAINT:
Three years later then, Doozy Twilight, pixeled by Exin, in fcbpaint:
I can lively imagine that. Using a tool similar to "Pixel Polizei" surely was a good way to go, so you could still concentrate on the illustration itself and let the code generator check whether the current workstage is within the hardware restrictions (as far as accessible by the code generator).So it was A LOT of trial and error, remaking stuff, moving things, breaking things before I had something that was error free. Changing one thing in the eye could break stuff on his nose for an example.
The paint programs mentioned above all run on native hardware, and are roughly ordered in their capabilities. Picasso is multicolour only, and unfortunately uses a bitmap size (176x176) that requires to clobber OS workspace, so getting other things running beside display is rather difficult. MINIPAINT employs a slightly smaller resolution (160x192), but it allows to mix hires and multicolour and the screen mode is much more OS friendly. Lastly fcbpaint offers much more colour resolution (in-line VIC register splits and 8x4 attribute cells) at a 168x192 resolution, but again uses OS workspace.
A common trait of these three editors is, they operate with effectively isotropic attribute data, so here you don't have to fear that changes in one part of the picture 'break' other parts of the picture that previously worked. All changes are local by nature. With MINIPAINT, changing a cell between hires and multicolour only happens where absolutely necessary so the current pixel is always put as intended. fcbpaint uses a similar logic, however the in-line VIC register splits require a manual check (compile within fcbpaint and eyeball whether it works out).
MINIPAINT comes with a tool suite, one of the tools allows to import line art, which then can be edited in MINIPAINT. Furthermore, a tool exists to export the picture so further refining in fcbpaint is possible. That's how Exin actually created the Doozy picture.
...
Do you have any plans to show up on Revision this year?
Greetings,
Michael

Re: Jalapeno 2nd place
I really like FCBPAINT, as it offers a very good trade-off between resolution and colour-granularity and is accessible to the end-user without having to worry about programming a display-routine with inline-rastersplits.
I did this picture 6 years ago with it:
Lots of rastersplits in there to simulate C64-resolution, but I had to make sure they all set the border-color back to black at the rightmost end.
What is still missing (apart from Minipaint) is a good way to import and convert pictures and do touch-ups on the VIC later. Using the restrictions of a raster-assisted graphics modes for a converter is a calculatory nightmare apparantly. This is also true for modes with different restrictions between rasters and charblocks like MFLI for example where chars are 8x8 but each raster can have different fg/bg/aux.
Also (apart from Minipaint/Minigrafik) nearly all other modes leave interoperability to be desired. So you can just have slideshows or text-adventures with an occasional picture to show.
To sum up: There is always a tradeoff between resolution, color fidelity, converter-friendliness and interoperability. It's fun to find out the extremes as well as the sweet spots between those. That being said: Come to Revision!