This (slightly longer) post covers a MG tool package (
download), which does huge global changes to a picture. To be more specific, the programs of this package facilitate to
remap the colour sources. This comes in quite handy, if a draft done in
MINIPAINT suggests it might be better to have another exterior border colour. It is also useful for outputs of PGM IMPORT and the ppm2cga converter (via the 'scrapfile' function of the
CGA panning viewer), which by themselves only realise one possible mapping of the 4 displayed physical colours to the colour sources.
The package is only intended for use with strictly multi-coloured pictures. If you process pictures which contain hires foreground attributes, you'll get unexpected results.
Biggest, and most important tool here is
REMAP itself. It takes source and target file names and remaps the colour sources. The assignments M(...)=... in the lines 11 to 14 determine, which colour source is mapped to what other colour source. By default, nothing happens (an example, which exchanges exterior border and background, is given below). REMAP checks for all foreground attributes to be the same colour and in multi-colour. It refuses to work, if the mapping cannot be done - for example, if the auxiliary colour happens to be orange, and this is supposed to be mapped to foreground, the video chip couldn't do this - REMAP then stops with an error message to tell you what went wrong. In general, it's always possible to exchange background with auxiliary colour, and foreground with border colour, respectively.
Multicolour pictures with differing foreground colours cannot be processed directly with REMAP. First, the foreground data is saved away and replaced by a single foreground colour. This is done with
SPLIT. REMAP can then proceed with its task, provided the mapping of the foreground attributes remains unchanged (i.e. line 12:
12 M(1)=1 must remain so!). Finally
JOIN rejoins (duh!) the processed 4-colour bitmap with the original foreground attributes.
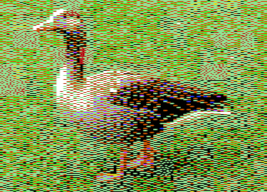
Now for an example: the splash screen of "Spider vs. Doc Ock" as drawn by
darkatx:
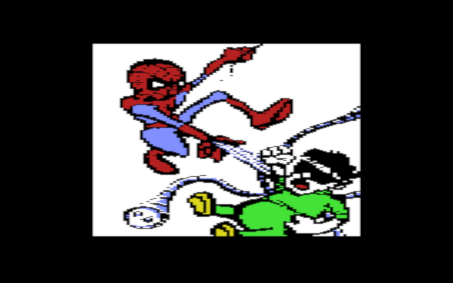
Unfortunately, the picture features a black border, where a white border possibly might fit better to the scene. So let's go - at first, a glance of the colour sources in MINIPAINT:
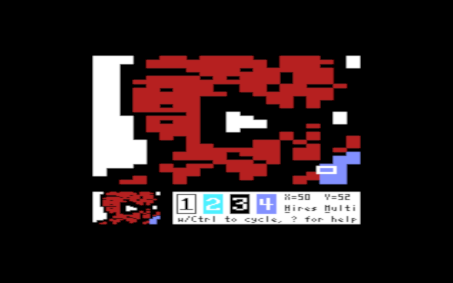
The colour numbers in MINIPAINT are offset by one (by a feature request to keep the colour keys grouped). For MINIGRAFIK, the background colour is #0, and
white; the border colour is #2, and
black, and the auxiliary colour is #3 and
light blue. It is intended to keep the foreground attributes as they differ along the picture (red, yellow, green and even white are used) - i.e. we'll go and exchange background and border colour source. But first we need to separate the attribute data. Cyan (physical colour code 3) serves as replacement colour:
Code: Select all
LOAD"SPLIT",8

SEARCHING FOR SPLIT
LOADING
READY.
RUN
SOURCE? SPLASH.1
BITMAP? BITMAP
COLOUR? COLOUR
REPL. (0..7)? 3
We get this result:
Now, REMAP can work upon the file "BITMAP" as this now only contains 4 colours. Lines 11 and 13 are prepared to exchange background and border colour:
Code: Select all
LOAD"REMAP",8

SEARCHING FOR REMAP
LOADING
READY.
11 M(0)=2
13 M(2)=0
RUN
SRC? BITMAP
DST? BITMAP2
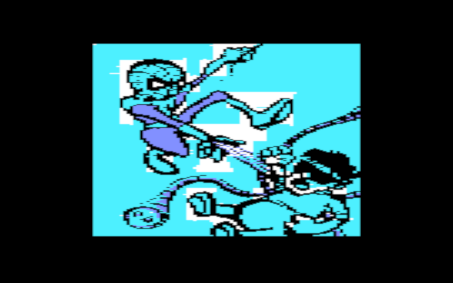
When REMAP has finished (after one minute or so), the colour sources have been remapped. The picture still looks the same, just the video chip generates the physical colours inside the display frame from other bit patterns. But most important, the exterior border colour now is white, as was intended!

Finally, we recombine the result in "BITMAP2" with the original foreground data:
Code: Select all
LOAD"JOIN",8

SEARCHING FOR JOIN
LOADING
READY.
RUN
BITMAP? BITMAP2
COLOUR? COLOUR
TARGET? SPLASH.2
... and here's the result:

...

Cheers,
Michael